Breathing New Life into an OG Xbox

Maybe it’s nostalgia, maybe it’s the insultingly high price of modern PC parts, but I found myself pulling an old original Xbox out of storage to have a play with. Since I’m a geek, I was immediately more interested in hacking and moding the thing instead of playing actual games on it. I’ve documented the process purely so I can look back to check what I did. Maybe it’ll help you too.
Hardware#
Internal#
Disassembly#
iFixit’s guide is pretty good. As long as you have a T20, T15 and T10 Torx screwdrivers, you’re all set.
Once you’ve gotten to the motherboard, you can identify exactly what revision you have. Mine seems to be a 1.4, here’s some labels to give you a lay of the land.
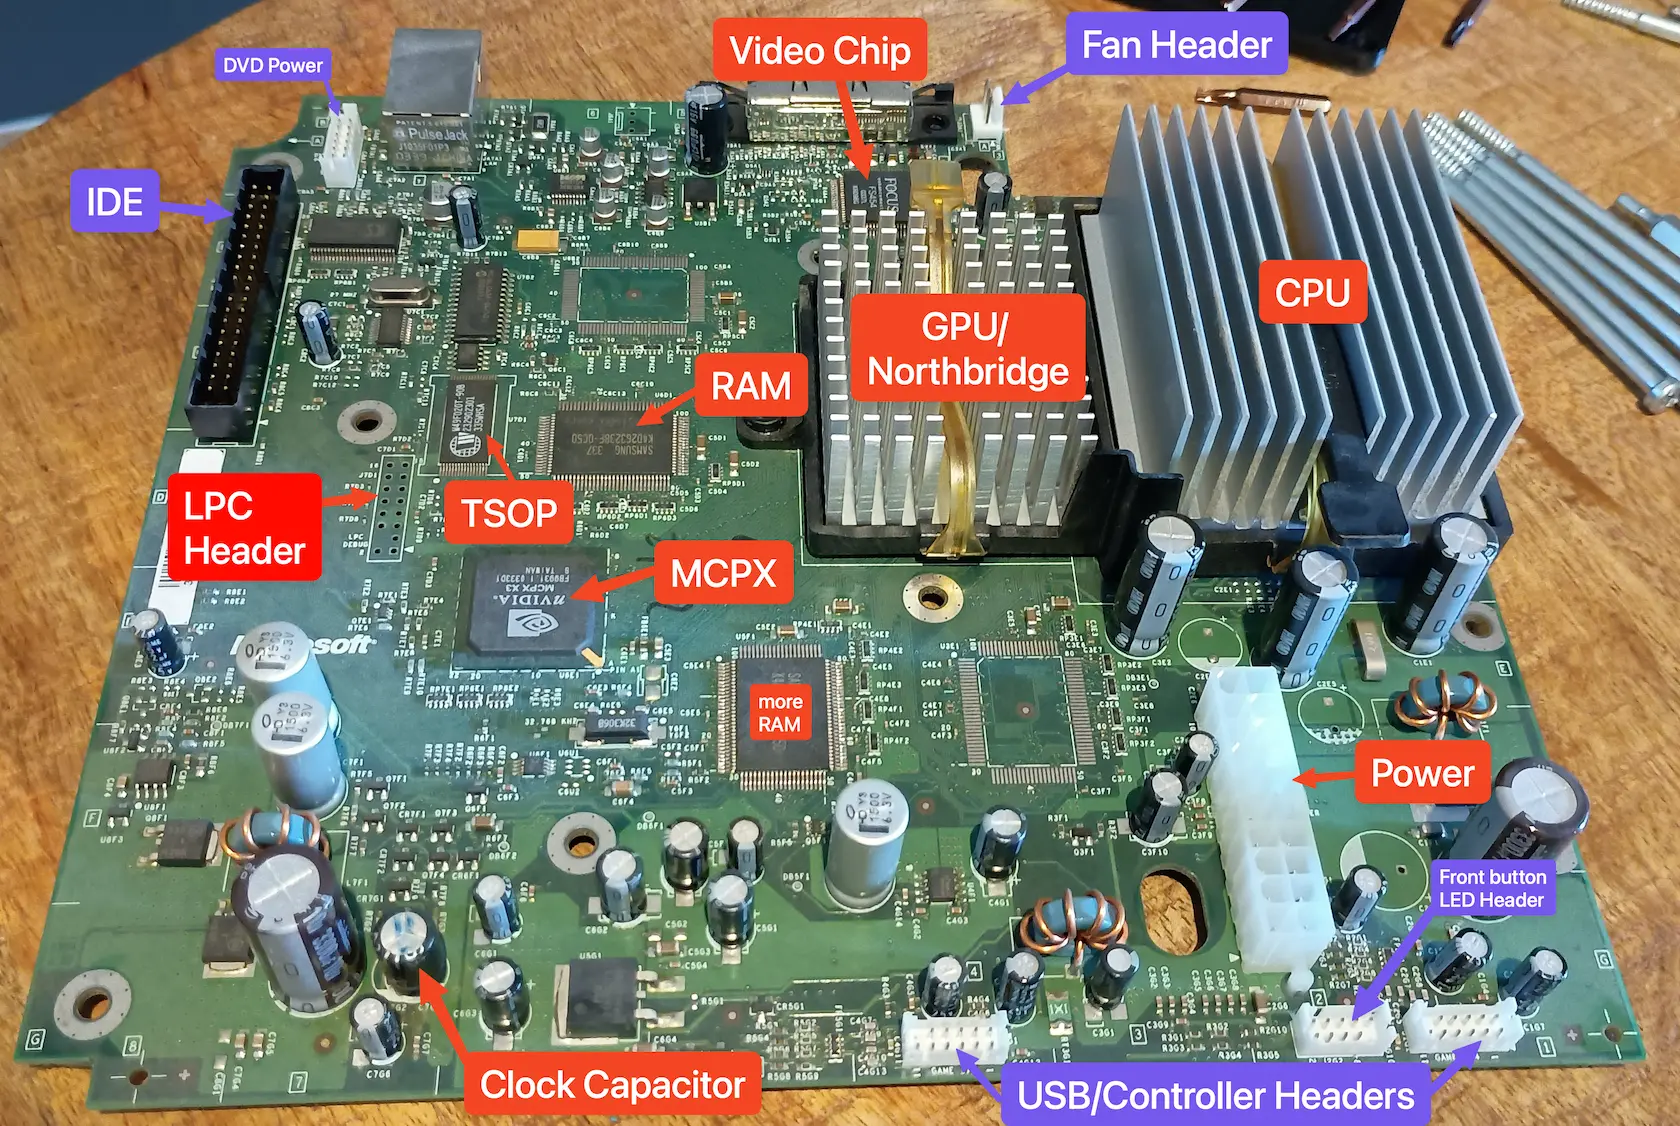
I’m sure the other bits are important too
Clock Capacitor#
Famously the clock capacitor on every revision love to leak and mess up the board, so I wanted to diffuse that bomb before turning it on. It’s a 1F (A whole Farad! 🤯) carbon aerogel 'super capacitor' near the bottom left of the board. It turns out to not even need replacing, with revisions 1.0-1.5 working fine with it removed. Our further hacks will give the Xbox NTP support so it’ll just grab the time off the internet if it’s left unplugged anyway.
I tried to look into why a capacitor was used instead of a more traditional 3V button cell. The nvidia 'south bridge', aka the MCPX (Media and Communications Processor for Xbox) is used to keep the time when powered off. Being a huge chip that handles sound, USB, IDE and PCI, it’s minimal power draw is still 0.14mA. That’s HEAPS. It would make a CR20232 flat in 2 months. It’s annoying that this alternative solution not only worked terribly, but would be the singular cause of so many Xbox deaths years later.
I know this 1F super capacitor was relatively expensive compared to a normal electrolytic one, though not sure how it would have compared to a dedicated RTC chip and lithium button cell. I thought the MCPX just didn’t work work with external standby clocks or something. Except people made RTC boards that work with a custom BIOS. It feels odd that Microsoft were being 'cheap' by using an expensive, brand new technology…
Other Capacitors#
I didn’t plan on replacing any other capacitors, but I couldn’t help but notice that one was budging at the top, and another had some suspicious gunk near it. I decided to order replacements, delaying my project a few days. You might want to consider buying a complete capacitor pack, just so that you can open up the Xbox and replace them in one sitting. I honestly don’t know how exact the replacements should be. You can just go by the μF and voltage rating, or start trying to match the tolerance, temperature rating, Equivalent Series Resistance… Anything a similar size/shape with matching Farads and Voltage is probably fine.
I had a lot of trouble desoldering the capacitors. Maybe my regular 65W soldering iron is not working well, but even at 450ºC, mixing leaded solder in, and plenty of flux, I couldn’t get the solder joints hot enough to melt all the way through. I had to bust out my gas powered iron that’s 125W equivalent to get enough heat.
Modchip#
Even though the Xbox was already 'softmodded', I wanted to install a hardware modchip to maximise flexibility. I went with one I found on aliexpress. It’s basically a RP2040 Tiny on another breakout board ready to fit onto the LPC header on the Xbox’s motherboard. The project that turns the RP2040 into an Xbox modchip is Modxo. The project for the breakout is here. Such warm fuzzies seeing an open source community emerge for the Xbox.
You should flash the chip with your PC on it’s USB-C before installing in your Xbox. You need to solder the 2x8 pin header to the vacant spot on the motherboard, soldering the bottom side so that the pins point upwards. The github readme makes a lot of mention about removing one of the pins on the header, which I found to be an obvious step, while they don’t mention which way round the board fits on…
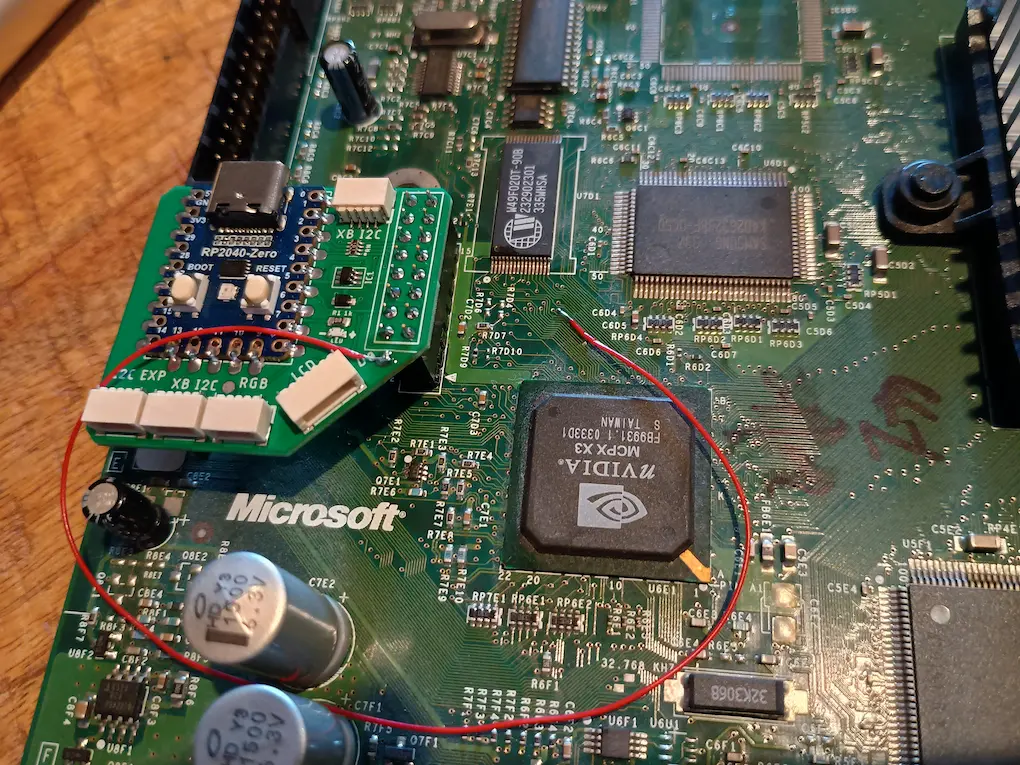
It’s this way around.
You can see there is one extra connection required, D0. There’s a pad on the breakout board for it, and you connect to it on the Xbox’s motherboard by soldering to a via:
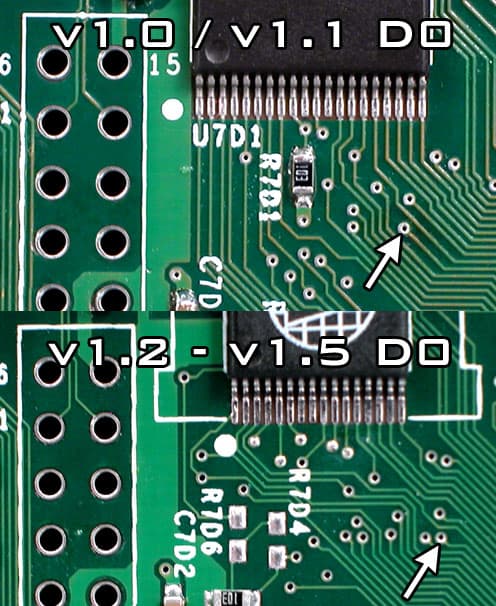
If you have a 1.6 revision don’t worry about it.
It’s really tiny, but some tweezers, a lot of flux, patience, still hands, and you’ll get it. Honestly it was easier than the capacitors. The via isn’t meant for soldering to, so it’s quite weak and easy to get ripped off if the wire gets snagged. I’d suggest at least taping it down.
SSD upgrade#
I had an old 500GB SATA SSD still in my desktop PC that I decided to donate to the cause, since SSD prices are also insane now. IDE to SATA adapter boards are still available, I grabbed this slim one from aliexpress. Otherwise Startech branded ones are claimed to work well. Being an SSD immediately helps with noise and latency, but to get any benefit from the faster speeds a new IDE cable is also required. See, the Xbox comes with a 40 conductor cable, running at Ultra DMA 2 / ATA33, limiting the speed to 33MB/s. Higher Ultra DMA speeds require a fancy 80 conductor cable. These cause a lot of confusion, as the connectors are still 40 pin. The extra cables are just connected to ground to limit crosstalk. Also one cable is disconnected to make 'cable drive select' function, so it’s technically a 79 conductor cable. A further tip for young players, the blue connector goes into the motherboard, the black one on the other end is for the 'master' device, HDD in our case, and grey for the 'slave', the DVD. I’m not sure how people are meant to know this.
The cable that comes with the xbox has it’s connectors upside down, so a normal 24 inch long cable can be tricky to hook up. I got a longer 75cm (29.5 inches) cable so there was plenty of slack to fit, honestly maybe too much between the motherboard and DVD drive. To actually get the benefit of this nicer cable, you’ll need a modern Xbox BIOS that lets you configure higher UDMA / ATA speeds. Ultra DMA 6 / ATA 133, for 133MB/s speeds. This does depend on the IDA to SATA adapter supporting UDMA 6 too.
I printed out a bracket to mount the 2.5" SSD, but found out at the last moment that it doesn’t fit with the adapter I had. I made do with a single screw and some tape, I might edit the design to fit my adapter better one day.
Fan Replacement#
I don’t remember the original fan being much of a problem, but it seems with age it has gotten worse. It’s so loud I can hear it throughout the house. My mate is a Noctua fan boy, so I wanted to put in a Noctua fan for the meme. Problem is the Xbox uses a 70mm fan, while Noctua only sell 60 & 80mm fans. You can squeeze an 80mm, but it requires chopping up some of the interior to do so. I went with the 60mm A6x25 fan, which on paper at least should move roughly the same about of air (17.19 CFM) as the stock one (20 CFM). There’s even a neat 3D printable bracket to mount it with the existing clips on the Xbox. To play it safe, I set the fan to 100% in CerBIOS all the time, since even then it’s much quieter.
If your not a Noctua fan boy, you can grab a 'Nexus 70mm Real Silent Case Fan' that reportly works well with it’s own 3D printed bracket, or simply try cleaning and relubricating your existing fan. If you’re lucky to have a NMB brand fan, oiling it is super easy and it seems to perform really well too.
Thermal Paste Replacement#
Even the best thermal paste doesn’t last forever, so while I had the XBox open I took off the heatsinks to the CPU and GPU and put new Noctua thermal paste I had laying around. Undoing the plastic clips is a bit scary, since the plastic is so old and exposed to a lot of heat cycles, I feared snapping them. I found it easiest to unhook the tab on the opposite end from the finger tab. A screwdriver to help push it down and out helped too. The CPU heatsink comes off easily, but the GPU’s paste is really sticky. You can try turning the Xbox on for a few minutes to heat it up and soften the glue, along with some squirts of isopropyl alcohol into the sides. I had the bare board so just used a blow torch to carefully warm up the heat sink. Cleaning off the old paste took ages with just alcohol, just be patient and don’t stop till both the heatsink and chips are totally clean. Or you can try using piss instead.
External#
WiFi Bridge#
You know I love a WiFi bridge, turning WiFi into ethernet. Since the Xbox only has a 100Mb ethernet plug, a cheapo small one works well enough. I got a VONETS VAP11N-300 MINI300 along with an Xbox controller to USB adapter, to power it. It does take around 20 seconds to connect to WiFi when turned on, but the Xbox takes that long to boot anyway so it works well. There a similar VONETS model with a bare PCB and external antennas if you wanted to try an internal install, but I didn’t want to drill any holes into the Xbox.
Controller Adapter#
The OGX-Mini project lets you use modern controllers with the original Xbox. Once again with the magic of the RP2040, it can work with basically every controller. I popped a premade unit into my aliexpress order, so I could use my modern Hyperkin Duke. I know most people hated that controller, but even in my 12 year old hands it was a perfect size and shape.
Software#
A brief history of Xbox hacks#
Growing up I was always a softmod kid, so it took me a while to wrap my head about the different modchip softwares and names. These things evolve over time in tight nit communities so there’s often a lot of assumed knowledge. Understanding things requres some historical context;
A normal, stock Xbox is much like a PC. On boot, the CPU loads a BIOS from a FLASH ROM chip. In the case of the Xbox, this is a TSOP packaged chip, so people simply refer to it as TSOP. The BIOS sets up basic hardware just like a normal PC, then kicks on to booting the game in the DVD drive. If there’s no game present, it’ll run the gorgeous dashboard program on the HDD.
The initial Xbox hack involved spying on the traffic between the CPU and the TSOP flash chip that stores the BIOS code. Microsoft tried to lock the BIOS down, by encrypting most of the BIOS and having the nvidia 'north bridge' supply the key to decrypt it on boot. So while the TSOP can be read and written to fairly easily, it’s contents are all jumbled up. Andrew "bunnie" Huang managed to spy on the HyperTransport bus that the MCPX speaks between it and the GPU. This gave them a decrypted copy of the BIOS to study and learn the inner workings of. Obviously I am glossing over a lot of detail, I highly recommend his book 'Hacking the Xbox' to learn more.
The Xbox motherboard had an unpopulated LPC header, probably used for testing during manufacturing. You can connect your own FLASH ROM chip that speaks LPC, and the Xbox will use it when the normal one isn’t present. So the first wave of Xbox modchips were inspired by Andy Green’s 'Cheapmod', simply a SST 49LF020 ROM chip that could speak LPC. You don’t even need to desolder the normal TSOP flash off the board, simply shorting a single connection to ground will make it turn off. A sea of modchips like Xenium and Xecuter had similar chips that came preprogrammed with a BIOS that would make the Xbox do useful things.
The Modern Era#
Team Resurgent came onto the scene in 2022, using the Raspberry Pi Pico, a general purpose microcontroller to do the task. The RP2040 has a unique Programmable Input Output (PIO), that makes it possible to talk rando protocols without dedicated hardware. So with some software, it can talk LPC and behave like a modchip. The project that does this is called Modxo. Putting the BIOS you want onto the RP2040 used to be a bit of a process, with tools to package Modxo and the BIOS together, and other tools that spat out a .uf2 file to flash onto the RP2040 after already flashing Modxo. They had to be kept separate since you may need a slightly different BIOS, and the problem that the modified BIOS is a copyright nightmare, while Modxo is clean open source.
Now this has been simplified by PrometheOS. This combines the software for the RP2040, with a fancy BIOS file that acts as a pre-boot environment. It lets you load and configure the BIOS on the Xbox over the network, instead of flashing it before installing. It gets a bit confusing since PrometheOS has also been made to work with original modchips, but I’m not in that situation.
Flashing Modxo#
My Aliexpress board seemed to arrive pre-flashed and ready to go, but I decided to flash it myself with the newest version of this just in case. Plugging in the board into your computer with the BOOT button held down, it will appear as a removable disk. This makes it easy to drag and drop binaries to flash, but won’t clear everything first. Grab a nuke_flash.uf2 file that will wipe the RP2040’s flash and give you a clean slate.
Then you can grab a ready to go firmware binary from xbins: XBOX/COnsole Based Applications/bios/PrometheOS/Prometheos V1.5.0.7z/Prometheos V1.5.0/ModXo/RP2040 Zero & Tiny Prometheos V1.5.0.uf2. Flash it and it’s ready to be put into the Xbox.
HDD#
Handily it is possible to set and up and load a new drive on a PC then chuck it into the Xbox ready to go. Xboxes use the FATX filesystem, not to be confused with exFAT! It’s basically a stripped down version of FAT16. XFATExplorer lets you mount FATX partitions as read/write on windows. It’s unfortunately not open source, but it is shareware with a 7 day free trial.
Use the option to format a drive, I selected 'CerBIOS' as the format since that’s the BIOS I’ll be using. An Xbox HDD doesn’t have a MBR or GPT to map partitions, instead the layout is simply assumed by the kernel. has the following partitions:
- C
-
500MB, The stock dashboard is kept here.
- D
-
(The DVD drive, not on the HDD.)
- E
-
~5GB, game saves and music ripped from CDs.
- X, Y & Z
-
750MB each, cache for running games.
You can hopefully get a copy of a stock C and E partitions here, point XFATExplorer to them and it’ll load them up.
We’ll also add an extra F partition to fill up the extra space of our 500GB SSD.
Transferring Games#
After the SSD is set up, you can mount the F partition with XFATExplorer. It comes up as drive X in Windows, but I’ll keep referring to it as F from the Xbox’s POV. We’re gonna put all our games in a folder called Games. You can get ISOs from Myrient, Vimm’s Lair, and/or ROMsFun.
But we have to choose what format to use. Xbox game discs are a bit weird; The start of the disc is a normal DVD video, so that when you put it in a DVD player or PC, it’ll just tell you to put it in an Xbox.
The real game is hidden after the video, with a bunch of padding in between. So a complete ISO of a game is ~8GB, and it will have a lot of non-game junk taking up space.
Not to mention the XFAT is limited to files up to 4GB, so the 8GB DVD ISO can’t be copied over as-is. Since we need to mess with the ISO anyway, can we do without the extra junk? There have been a few different methods, which confusingly are all called XISO by the community.
- Rebuilt XISO
-
Just the game data. Nice and small, but some games break when they check for the missing parts as a form of copy protection.
- Trimmed
-
Remove unused parts of the disc. Unclear to me exact what is trimmed off, some describe it as "empty sectors at the end of the image". Doesn’t save much space.
- Scrubbed
-
Make all of the padding zeros, so that it can be compressed well. On XFAT and most filesystems that don’t have transparent compression, this still takes up a lot of space.
- Truncated
-
Remove the 387MB DVD video part to save space.
There is now a new format, Cerbios Compressed ISO (CCI) aka (CSO). This combines trimming and scrubbing with LZ4 compression. It potentially slows down loading/gameplay, though LZ4 should be crazy fast even on the Xbox. It is known to not play nice with some games, but most people seem to like this format the most these days.
There’s also 'HDD Ready' aka just the game files. This is what DVD2Xbox does, it recreates the disc’s file structure into a folder on the XFAT partition. It does some patching of the game’s executable to make it work in it’s new home. This is what everybody did back in my day, and I don’t remember having any issues.
Unfortunately I can’t make a firm recommendation, as the exact format and packaging that works best depends on what BIOS and dashboard you’re running. Check this spreadsheet for known incompatibilities with certain games in different formats.
I went with CCIs made with Repackinator. I warn you however that it is dog slow.
FTP#
With the modchip and SSD ready, I could put the Xbox back together and perform the rest of the setup while it’s running. PrometheOS on the Modxo will boot and present a menu and stats. It’ll show it’s IP address, so you can connect via http://ipaddress/ to load your BIOS. You can also connect via ftp://ipaddress/, with the username & password xbox. I found the PrometheOS FTP server was a bit slow and didn’t work with Cyberduck. MacOS’s builtin FTP client doesn’t support writes, and Window’s is known to be very buggy and unreliable. I only found filezilla to work, AFTER you make sure to go into settings and set the 'Default transfer type' to Binary. By default it will guess and corrupt half the files you transfer. 🙄 The FTP server in XBMC didn’t have any of these issues.
BIOS#
There have been a lot of custom/modified BIOSes over the decades, the latest and greatest appears to be CerBIOS. Due to the aforementioned copyright problems, you can only find it on xbins. I was so surprised and happy to see xbins continues to exist and be useful. Back in the day accessing it required joining an IRC server, requesting a login and a bot would answer with a temporary login to a FTP server. This was somehow enough of a song and dance to avoid being taken down by Microsoft, which is so shocking to me. Now there is dedicated software to browse xbins, Pandora, complete with dial up modem sound as it logs in for you. You’ll find CerBIOS in XBOX/Console Based Applications/bios/Cerbios. The current version as of writing is V3.1.
Visit http://ipaddress/ in your browser with the Xbox booted into PrometheOS’s menu. Use the webui to upload your BIOS file. CerBIOS also needs a configuration file, and you’ll be tempted to click the 'edit cerbios INI' button on the webui, but DO NOT. CerBIOS version 3 changed the format and location of the configuration file. Instead you’re going to edit the cerbios.ini in the folder you downloaded from xbins. It has decent explanations for each setting, I kept the defaults except for
; For some reason the stock arrangement (HDD+DVD) isn't the default
DriveSetup = 0 HDD+DVD (Stock)

; For the SSD to run at 100MB/s
UdmaModeMaster = 6

; Leave the tiny Noctua fan running at max speed all the time.
FanSpeed = 100
OverrideFan = True
You’ll also need to set the DashPath depending on what dashboard you use and where you put it. It’ll boot the stock dashboard if you don’t set it, or if it’s wrong. Once you’re happy with the configuration, use FTP to chuck the config file into E:\Cerbios\cerbios.ini. You can always boot into PrometheOS and edit the config, so no stress about making sure it’s all correct.
There’s also CerbiosTool, that lets you modify the dog logo that appears when CerBIOS boots, but I didn’t bother with it.
Dashboards#
XBMC was the GOAT back in the day, but mostly abandoned since it took off as a PC app called Kodi. Last year there was a new 4.0 release for the original Xbox, bringing it up to speed with the newest Kodi build. I tried it and unfortunately the modern Kodi skin displays an awful game library list. I tried scrappers to make the list have artwork and info but both just crashed the dashboard.
Another revitalised project is UIX, a project to mod the stock dashboard with more features. I really like the idea, since the the nostalgia hit of the original menu is exactly what I’m going for. There’s an experimental build called 'Theseus' that works with CCI games, but it didn’t work for me. 🥀
XBMC4Gamers is the most maintained version of XBMC for the original Xbox. It has this weird profiles system which I’m not interested in, but at least it displays your games with pictures and names. Download the files, and FTP them into E:\XBMC4gamers. Then make sure to set the path in cerbios.ini:
DashPath = E:\XBMC4Gamers\default.xbeGetting the game artwork to to work properly requires specific steps in specific order;
-
Press the black controller button to bring up the options menu.
-
Go to Settings.
-
Go to Downloader.
-
Select ARTWORK from the list of categories on the left.
-
Near the bottom of the list, select 'XBOX ARTWORK INSTALLER ONLINE'
-
It will ask you where to install, 'Create Folder' is greyed out so I had to FTP into the xbox to create a folder
E:\apps\. -
Now to run the script, black button → Settings → XBMC4Gamers Options → Scripts → Xbox Games Artwork Installer Script. It’ll download artwork for most of your installed games.
Then finally you can browse your games.
Other mods you might consider#
- XboxHD+
-
A hardware mod that wires into the video chip to output a real HDMI signal. My TV has component video which looks great already so I didn’t bother. It’s also closed source and there seems to be drama between it’s creator MakeMhz and the open source focused team resurgent.
- RAM upgrade
-
The motherboard has pads to solder on two extra RAM chips, allowing you to double the RAM to 128MB. Games don’t know about the extra RAM though, so only homebrew apps can make use of it, and even then not many do.
- CPU Overclocking
-
Similar to the RAM upgrade, it doesn’t affect most games, just Half-Life 2 and some emulators. I’m already running a smaller fan so I didn’t feel the need to push it. Some people even swap in a whole faster CPU.
- LCD
-
Old Xenium modchips had a feature to connect a HD44780 20x4 character LCD display. There have been mods that use OLED screens instead, and modern Modxo/CerBIOS can be configured to send stats over the SMBus. I can imagine something nice looking with a modern display and microcontroller, or even a VFD for that retro green vibe…
Comment
- Username, 2026-01-27